Quick tutorial to deploy your ML models using FastAPI and Docker

The goal of this blog post is to make an API to get predictions from a pre-trained ML model and how we can do that in a fast manner using FastAPI and also be able to ship it using Docker.
This method does not scale well as it does not support caching and cannot handle much load. However, this can be a good instructional post on how you can deploy those models and use them for small low-scale projects, say a hackathon.
In the tutorial we will use the very famous Iris dataset. The dataset has 4 features -
- Sepal Length
- Sepal Width
- Petal Length
- Petal Width
These lengths are in cm, and these fields are used to predict the type of the Iris, among 3 categories - Setosa, Versicolour and Virginica.
Project Structure
Given below is the outline of the files and location of the files so that it is easier for one to follow the tutorial.
ml-deployment/
│   .gitignore
│   Dockerfile
│   logs.log
│   README.md
│   request.py
│   requirements.txt
│   server.py
│
├───models
        iris.py
        model.pkl
        model.py
Model Training
Since the goal here is just to make a POC deployment, we make a very simple model trained on the Iris dataset. Some very basic knowledge of Scikit-learn libraries will be needed to understand the code.
The model is saved in a pickle format. We will load the saved model to do predictions later.
Now, along with this, we have to ensure that when the API will receive the paprameters, it receives them in a proper format, for example, a list of lists in which each list has 4 float values for the features.
For that we use Pydantic.
Creating the API
As mentioned earlier, we use FastAPI to make our API. From the website -
FastAPI is a modern, fast (high-performance), web framework for building APIs with Python 3.6+ based on standard Python type hints.
It also claims to have Very high performance, on par with NodeJS and Go (thanks to Starlette and Pydantic). One of the fastest Python frameworks available.
The whole code is given below, I’ll explain the details below as well.
Here, we define the name of our app.
app = FastAPI(title="Iris Classifier API", description="API for Iris classification using ML", version="1.0")
Next, we set up logging for our API as well, to ensure we can see WHEN something went wrong, in case something does go wrong.
# Initialize logging
my_logger = logging.getLogger()
my_logger.setLevel(logging.DEBUG)
logging.basicConfig(level=logging.DEBUG, filename='logs.log')
Then we use a FastAPI decorator called @app.on_event("startup") to specify the operation which we want to perform when the server starts up. Here we load our model so that once the model is loaded in the initial phase, the predictions can be served as fast as possible.
@app.on_event("startup")
def load_model():
    model = pickle.load(open("models/model.pkl", "rb"))
Finally, our main logic of serving the predictions -
We get the data that the API receives from the server and require it to be in the Iris format, which we specified using Pydantic.
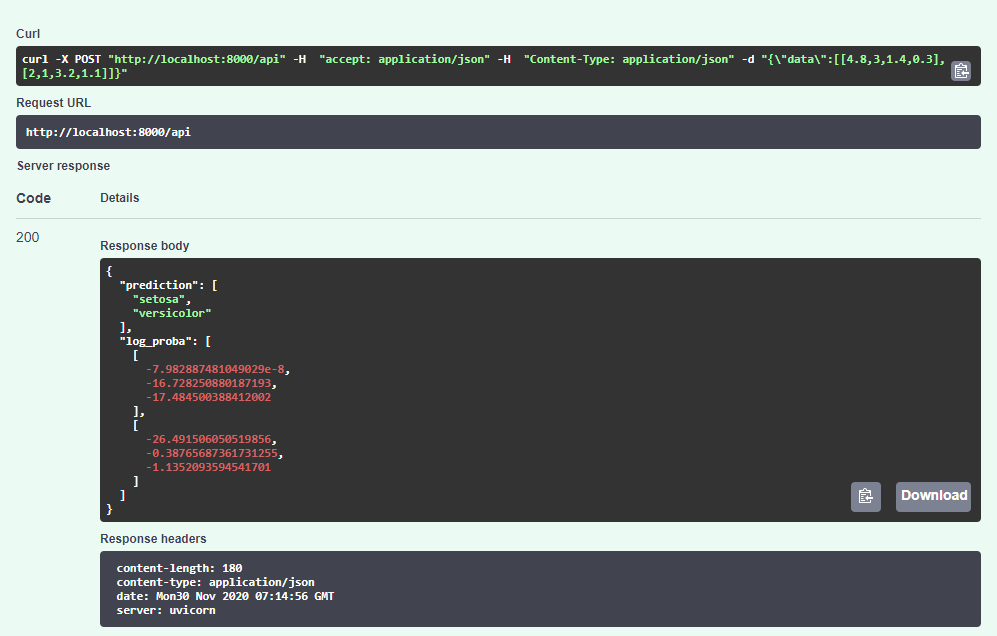
We run the model on those examples, get the predictions and then map them to the flower type. The classification and the model probability of the prediction is returned as a JSON response.
We have a try-catch blog to make ensure any wrong input format or any other kinds of errors does not break the server.
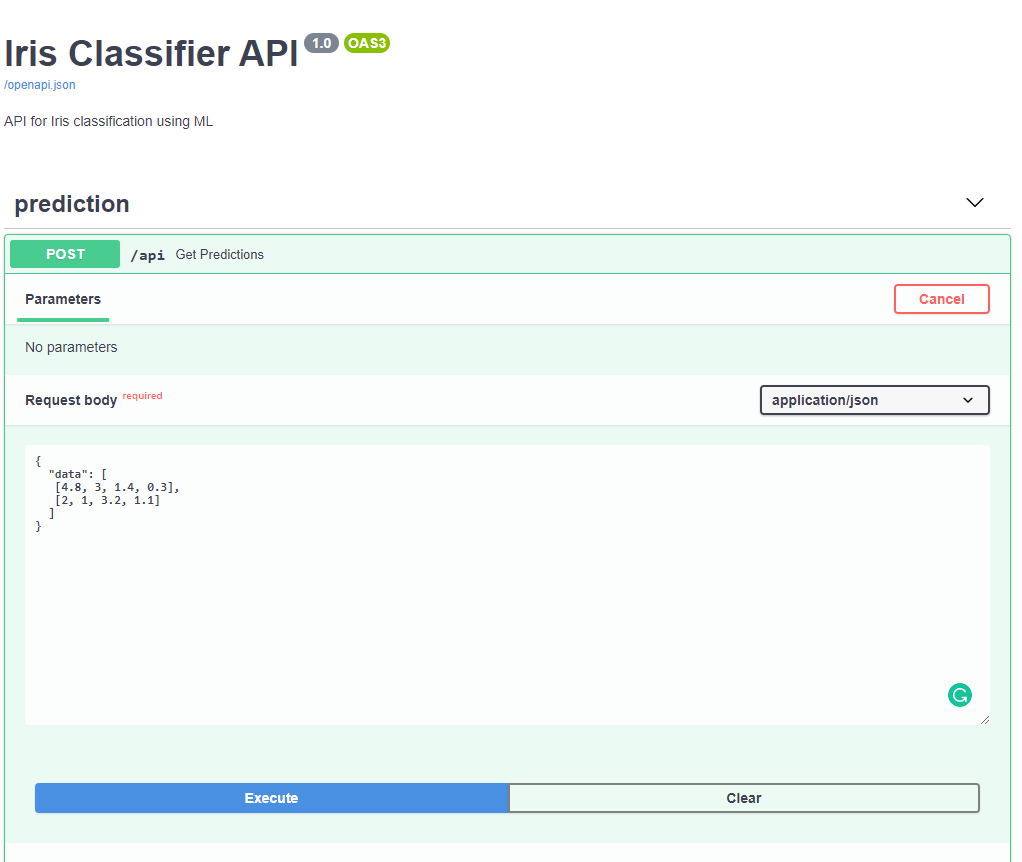
Let’s see it in action
The FastAPI provides a dashboard from where we send requests to the API. It is at http://localhost:8000/docs.


Dockerise Everything!
So now, if we have to ship it, we want to convert it into a Docker image.
For that we create a Dockerfile.
Basically, the Dockerfile instructs Docker to first create a /app folder inside the Docker python3.8 base image, install the requirements (Python packages) and then run the app on port 8000 in the Docker container, and expose that port to access it from our local machine.
Now, we just have to run two commands -
$ docker build -t iris-ml .  # Build the Docker image
$ docker run -d -p 8000:8000 --name iris-api iris-ml   # Run the Docker image as container
The requirements.txt for the project are also listed below -
numpy==1.18.4
pydantic==1.6.1
requests==2.24.0
fastapi==0.61.1
scikit_learn==0.23.2
uvicorn==0.11.8
Now you can head to http://localhost:8000/docs to test the API.
If you see the dashboard and the responses similar to the screenshots above, you have most likely deployed it successfully.
Congratulations!!
Now that you have the Docker image, the entire environment can be recreated on any other machine. You can push the image to DockerHub (refer here) or export as a tar file to share to another host.
The entire code is also available on my Github - https://github.com/shreyansh26/Weekend-Projects/tree/master/MLDeployment/v1